One of the best-practices in affiliate marketing is to send your readers or shoppers, not to the homepage, but to another more appropriate and carefully-selected page of the merchant or advertiser you are promoting. By appropriate, I’m referring to a page designed specifically to sell the product or service you “warmed up” your prospective customer to before they left your site or used your link.
An Introduction to “Deep Linking”
This linked page, often called a “landing page,” is often a specific product’s main page with additional details or a buy button. It’s usually a specific page that has been tested and optimized specifically for the purpose of converting visitors to that page’s product or service into buyers.
Sending prospective customers to these specifically-chosen landing pages is often called “deep-linking” within the affiliate marketing industry. Doing this can dramatically increase your sales conversion rates and has at least two distinct advantages:
- Reduces the clicks needed for prospects to take action (i.e. buy).
- Reduces distractions “along the way” as you transfer them to the desired destination.
There is a problem, though, with most affiliate programs: Most merchants or advertisers have many hundreds or even thousands of pages and they don’t know to which one(s) your audience will best respond. Furthermore, chances are very high the affiliate manager has not made available to you links to the best pages for your marketing efforts. So what are you to do?
You can ask for him or her for deep-linked affiliate links. And wait for them to be created for you. Or, for many programs, you can make your own!
Fortunately, ShareASale has made the process of creating your own custom deep links very easy. In this post I’ll walk you through the process and include some tips to use along the way. I’ll be using an example from Perdue Farms, a program exclusively available on ShareASale (learn more or apply here).
How to Create a Custom “Deep Link” in ShareASale
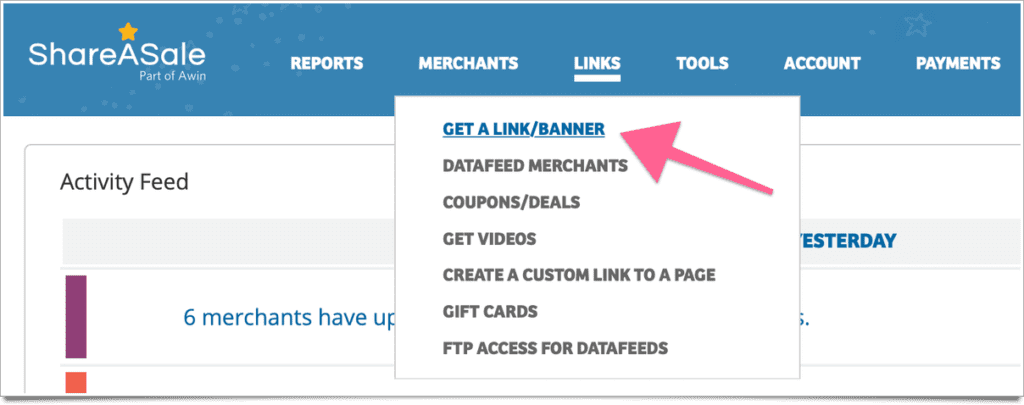
First, under ShareASale you’ll see the main navigation menu option for Links. Under that heading you’ll see the “Get A Link/Banner” option. Select that as shown below.

Second, that menu link will open up the “Select Merchant” option. My suggestion here is to start typing the merchant’s name within the search box as shown below. Doing so should update the ShareASale merchant query in realtime so it’s likely to show up your desired merchant if you are joined to their program.

Third, you’ll see the various types of affiliate links available for the merchant you selected. Go to the “Create Custom Link” option and click that entry as shown below.

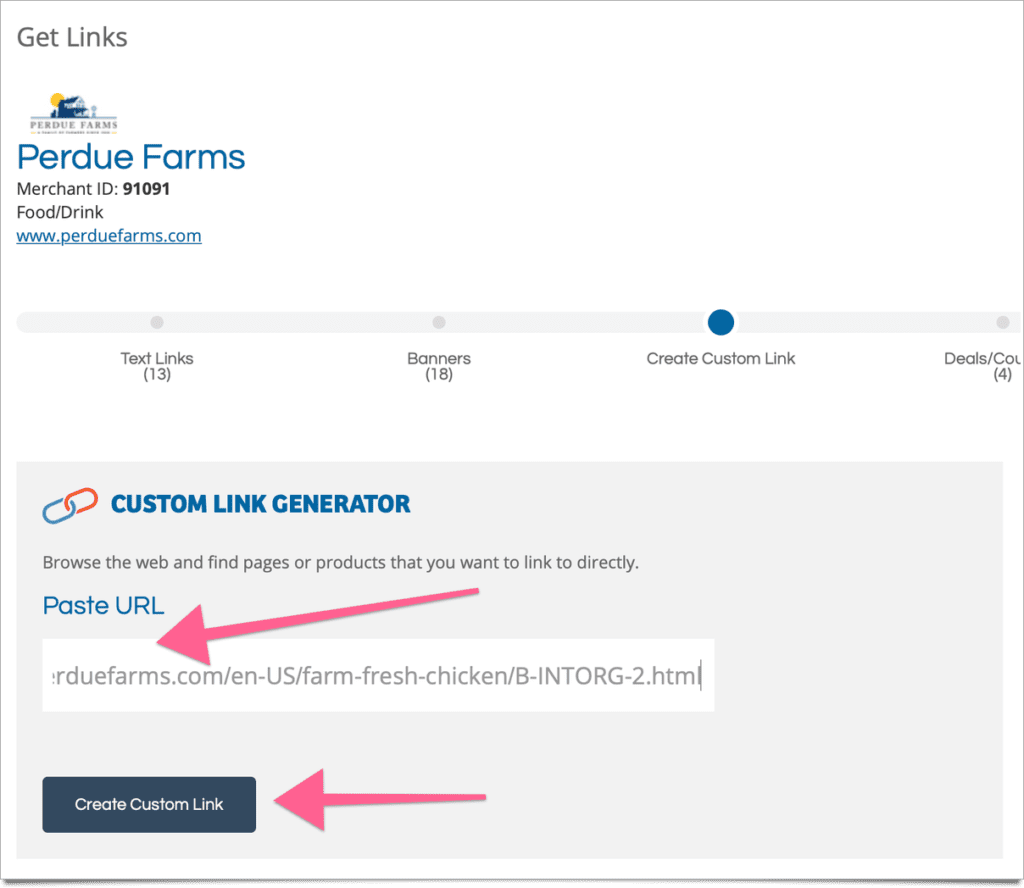
Fourth, this will open the actual Custom Link Generator as shown below. From here you simply paste in the full URL of the landing page you are wanting for your deep-link into the box shown by the top arrow below (copy the entire link or URL as found in your web browser’s address bar). Hint: If the merchant has given you any special tracking parameters or a URL snippet designed to trigger something like a special discount or a co-branded landing page experience, be sure to include them within this URL (usually appended to the end of the URL). After you have pasted your URL into the box, click the “Create Custom Link” button as shown below.

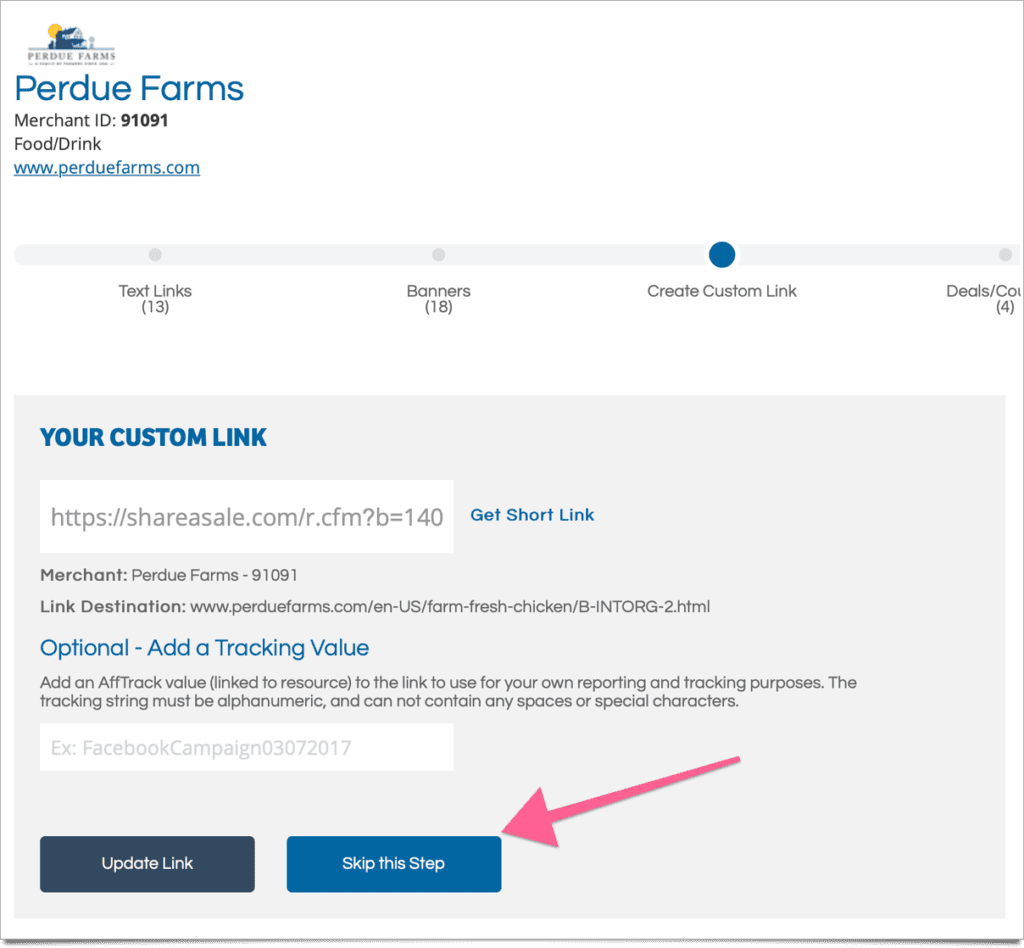
Fifth, the “Create Custom Link” button above takes you to the next step shown below. While everything in this step is optional, at this stage I find it useful to verify that you actually pasted the correct deep link (and any parameters). It will be printed out next to “Link Destination:” as shown below.
At this stage you can also add your own tracking value if you wish to track performance across various venues where you will use this custom link. For example, you could use this tracking feature to segment the performance of the same link across a newsletter campaign, a post on Facebook, a tweet, and your blog’s sidebar listing. Just enter a different tracking value for each platform and click the “Update Link” button. If you do not wish to add any tracking values just click the “Skip this Step” button.

Finally, after clicking either of the buttons above, you’re ready to copy your custom link. At this point you’ll be at the screen depicted below where your link is ready to copy and paste into your affiliate marketing efforts. The “Get Short Link” option exists if you want to shrink this long custom link down to a more manageable size through this built-in ShareASale link shortener tool.

Now you’re ready to use that link! After going through the above steps a few times you may find you prefer making your own custom links over relying on the ones provided within ShareASale. In any case, you have options — and definitely much more control over where you send your prospects!
Editor’s Note: Content on this post accurate as of 13-Feb-2020.


How can you delete the custom link line?
That’s a good question, Mikhael. I haven’t found a way to actually delete a custom link once it’s created; however, you can edit each one with a fresh URL to change where that custom ShareASale link goes. Here’s a screen shot example: https://share.businesswright.com/8Luryvn4